Tuesday, December 29, 2009

Through Door Number Two

You may recall the "two-for-one" bathrooms we worked on earlier this year. Well, here are some pictures of bathroom number two, done simultaneously with the one pictured last week. Same sort of layout...awkward, cramped space with outdated fixtures and finishes. An interior closet, next to a closet opening from the hallway, were taking valuable floor space from this tiny bathroom.


This photo shows the closet from the hallway, once the doors were removed during demolition. This is ultimately where the bathroom entry door will go.


Next week, I'll start to reveal the solutions used to maximize the new bathrooms for function and aesthetics!

Happy New Year!

Tuesday, December 22, 2009

Old and Tired

Early last year, two of our friends decided it was finally time to do the bathroom renovations they had been talking about for years. I had done some drawings of what I thought would work in the new spaces, and it was time to get off the mark. Yes, I know it's crazy, but they decided to redo both of the bathrooms at the same time. From financial and logistical standpoints, it made sense...but I'm not sure they knew exactly what would be in store. They did survive it all though, and are still raving about the difference the new bathrooms make in their daily lives!

Here are some before pictures.


This is one of the two bathrooms. In this one, aside from the dated and "scabbed together" tile, the space was cramped to the point that the bathroom door banged into the toilet when it was opened. The challenge was to squeeze every square inch of the space into something more attractive and more functional. We couldn't change the footprint due to the layout of the house, so it took some careful planning to open up their bathroom spaces and still maintain approximately the same amount of storage that they started with.

The solution entailed moving plumbing and electrical, both bathroom doors (one to a different wall, and one just a few inches "to the right".) The demolition uncovered some surprises, and some predicted situations. I can wow you (or scare you!!) with some of the "during" photos in days to come.

By the way...Happiest of Holidays to you all. We'll catch up next week!

Friday, December 18, 2009

The Next Challenge

Here is my next challenge at our European Chic home.


The owner has never been happy with the original fireplace detailing. It was pretty much bungalow-standard. He re-built a mantel, and painted the brick, but knows that it is still a project for help.

I actually love the idea of the ornately framed mirror in front of the fire-box opening. But I intend to do a plan that will re-face the entire fireplace, covering the brick, and a new deeper mantel, simply trimmed with mouldings that will add richness and elegance to make the fireplace fit better in this wonderful room. Will keep you in the design loop!

Tuesday, December 15, 2009

All In A Day's Work...(Well, Maybe A Few Days)

We saw some pictures of this wonderful home last week. Well, this owner is a type-A over-acheaver, and really gets his homework done! We spent some time picking out new paint colors, and a few days later, the first room painting was almost complete! Here are the results.

Here's the before.

And the new paint colors.

These rich, dark colors really bring due attention to the museum-quality furnishings. As we move through the rooms and add new paint colors to the walls, trims and ceilings, we'll work in this same color family, though the other rooms will start to lighten up the pallette.

I have termed the decorating style in this home "European Chic". It makes me think of the Literary Salons I've read about. This is one I'd love to be a part of!

Friday, December 11, 2009

Blinded By The Light

A really fun homeowner has asked me to help her and her husband bring some warmth and personality to their master bedroom/ bathroom suite. As you can see from these pictures, they have the luxury of a huge space, with lots of light. You might almost say, too much space, and too much light!


They like the brightness of the room, but currently have no way to bring the light level down during the day. And the light walls and ceiling, and broad, uncovered expanse of flooring aren't helping with the intimate feel they would like for the bedroom.

We started by going over a list of what they would like to change in the rooms...then talked budget. Together, we soon realized that the $$ were going to run out long before the last item on the list was accomplished! But that doesn't mean that we couldn't make significant changes to make the room more warm and relaxing, and still stay within the dollar amount they'd like to spend for now. As they say, "The Way To Do Things Is To Begin", right?

So we pared the list down and came up with priorities that would make immediate and meaningful impact. At the top of our list are mouldings. A heavy crown mould will be added into the junction to the tray ceiling, which will dress the space up and actually bring attention to the fact that there is a detail in the ceiling. We also plan to trim out the arch opening into the master bath, and soften the curve of ths opening at the top.

Once trims have been installed, darker paint colors will go up to make the space feel cozier, and add personality. Here you see paint samples being tested.

We've ordered 3" louvered shutters for the windows and French doors, and we have samples of beautiful fabrics to consider for fixed side-panels on the windows. While this is going on, we're gathering bids for a built-in cabinet to surround the flat-screen TV and accommodate the electronics equipment, and furniture shopping has started. With careful consideration and shopping, we're going to end up with a whole new room!

I'll show more as the project develops!

Tuesday, December 8, 2009

It Is An Honor

Each and every time a new client asks us to help with a design project in their home, it is truly an honor. To place that kind of trust with us-a trust that we can turn their own home into a more comfortable and enjoyable space-is ever reassuring as designers.

I recently received a request to come into a home to help with some design aspects that were stumping the owner. Well, what a pleasure to step into this charming bungalow, and find it filled with exquisite furniture and art...each piece more wonderful than the last. This collection of finery had been accumulated over years, and is continually added to. The stumbling block was "putting it together".


This is exciting to me! We began by talking about what they liked about the space and furnishings, and what they felt wasn't working. That allowed me to lead the design in a direction that I believe will really finish off the space beautifully.

We're starting with some careful editing. (The homeowner loves each and every piece-with good right-and they like the fullness.) For instance, in the first photograph above, you see a fantastic large mirror, and a beautiful console table flanked by the quirky little side chairs. Unfortunately, because they're all spread out on the wall you don't get focus on anything. I suggested hanging the mirror above the table, removing what is on the other side and pushing the two chairs a little closer to the console. The design should be all about creating vignettes. Well, a couple of days later when I went back for color consultation, the moves had been made and it looked great!

I'll be posting more before and after pictures as the work progresses and new color goes up on the walls. You'll enjoy following this project along!

Friday, December 4, 2009

More Holiday Decorating

A few years ago, I watched a Martha Stewart episode where she was making a holiday wreath out of dozens of multi-colored glass balls. Well, let's just say that I am a huge fan of Martha's, but she can still crack me up. (Hey, maybe that's intentional...hmmmm.)

Anyway, she is just hot-gluing more and more of these glass balls on this wreath form, and very casually she looks up. The camera zooms in, and she says, "...and just when you think you've done enough, do a whole lot more!" Geez, it still makes me laugh! (By the way, her wreaths were predictably beautiful!)

Well, we take her advice to heart every year when we decorate our own mantle for the holidays.

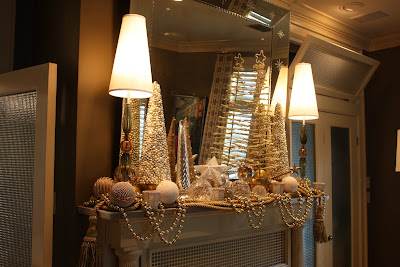
This idea at our house sort of grew out of a bunch of extra things we had left after decorating the rest of the house. And of course, as only we know how to do, we began adding to the collection. The great thing is, really none of the items used were expensive. What I think makes it work is that there is a unifying factor...in this case, color and well, glitter! The trick is, when you mass things in this fashion, it really makes an impact.

So this year, why not try something different, pull out some of your neglected holiday trinkets and see what you come up with. We'd love for you to share your pictures and let us show our readers. Email them to info@intspacesinc.com

And just remember, you just can't do enough. Gosh, it just doesn't work the same way when I say it!

Tuesday, December 1, 2009

Holiday Spirit

In the true spirit of the holidays, I thought it would be fun to share with you a couple of decorating ideas from our own home. Several years ago we started a "themed" tree in our living room for Christmas. We found a perfect sized tree-no small feat considering the size of our living room!-and decorate the tree in golds, silvers and crystal. We love it, and think it's perfect in the room. But...

Now, what do you do with all the fun, traditional ornaments you've been collecting? We found a great solution! We took a couple of inexpensive artificial wreaths, and started attaching the ornament collection to them. Now, each year we slip the glass shades off of our pendant lights in the kitchen, and gently settle each ornament filled wreath down onto the shade, then carefully reattach the shades to the light hardware.


It's great fun to be able to enjoy these at every meal through the holiday season, and remember where we might have gotten them, or who gave them to us. We add to it each year with an ornament or two from places we travel to.

Here are a few just added this year.

From our favorite vacation spot, Ogunquit, Maine.

We bought this one at Grand Central Station in New York City last New Years.

This hummingbird came from the wonderful gift shop at the New York Botanical Gardens.

When it's time to put these away for the year, we lay each wreath flat on a piece of cardboard, wrap many of the fragile ornaments in tissue paper and wrap the entire wreath and cardboard in stretch wrap. Ready to unwrap and put up again next year!

Hey, send us pictures of your own neat holiday ideas! info@intspacesinc.com